
Most people don’t set out to kill their grass. I, on the other hand, was on a mission.
Our neighborhood doesn’t have much in the way of sunshine because the houses are built so close together. As a result, I grow things in a community garden plot so I can keep the fresh veggies coming all summer!
For the last two years, I’ve been growing in a community garden was about 4.5 miles from my house and up a HUGE hill – which I would ride with my 3 year old in a bike trailer. My city recently finished building a new community garden that is a lot closer to my house – close enough that I can walk to it. Which is perfect since new babies can’t go in bike trailers and I’ll be having one of those pretty much any day now!
The location was great. The price was great.
There was only one problem: GRASS
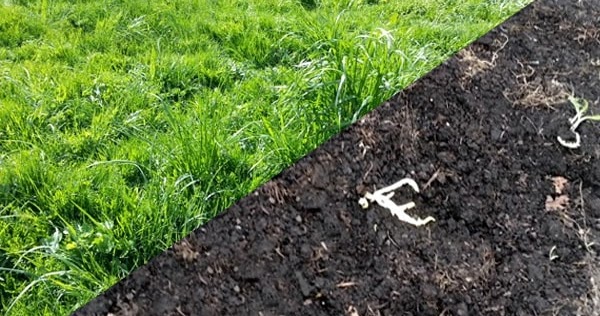
The city had built raised bed quadrant plots for us, filled them with good quality dirt and then over the winter grass took hold. And not like grass here and there. Like, a rich, thickly rooted lawn grew on top of the raised beds over the winter. When I was ready to start gardening in April, I was faced with a 20′ x 20′ plot of this:

YIKES!
My friends in the plot next to mine painstakingly flipped their 20 x 20 plot shovelful by shovelful to turn the grass under. Being 8 months pregnant, however, I was NOT interested in so much back breaking labor – and really felt like it wasn’t fair to ask my husband to take on such a big task on his own. Especially since I wasn’t sure I’d even do that much labor without being pregnant.
After some research I developed a great plan to destroy the grass in my plot without chemicals and without a lot of backbreaking labor.
Here is what my plot looked like 4 weeks later:

Beautiful black dirt with just a couple plants to pop out here and there. And it was EASY! Let me show you what I did…
How to Kill Grass the Non-Toxic Way

Supplies
- LARGE pieces of cardboard – check at mattress and appliance stores.
- Hose and spray nozzle or sprinkler
- Rocks or water filled jugs to help weigh everything down
Directions
Step 1: Cut the grass short
You can leave the clippings on top of the plot – no need to rake or bag it up. The goal is to get the grass short so the cardboard is less likely to “float” on top of tall tufts.
Step 2: Soak it
Get your hose and drench that sucker! Or turn on your sprinkler and walk away for a while. Make it very very wet.
Step 3: Lay the cardboard out on top
Get large pieces of cardboard and lay them out on top of the grass you want to kill. HUGE pieces do best. I had a few largeish boxes and they were too small. I’m talking ginormous – like boxes for mattresses or refrigerators. Be sure to overlap the edges so no sunlight in sneaking around the sides.

Step 4: Soak and weigh down the cardboard
Get your hose or sprinkler back out and drench your cardboard. This will take a while the first time you do it and your sprinkler (if you have one) will be your best option.
Once your cardboard is absolutely drenched, weight it down in different spots by placing large rocks or empty milk or laundry jugs filled with water on top. This will help keep the corners from blowing up if the cardboard gets dried out.
Step 5: Water the cardboard occasionally
Be sure to pop over to your garden and water your cardboard every day or every other day if it isn’t raining. Part of how this method works is by both smothering and blocking light from getting to the grass so keeping it damp and weighed down is critical.
Step 6: Clean it up
After about 3 weeks you can start to check your progress. Pick up a corner and peek underneath to see how the progress is coming along. I ended up leaving my cardboard on for a full month before removing it and it looked AWESOME!
I raked it lightly to get up any dead grass chunks. I also dumped used coffee grounds over the top to use as a mulch (just pop into your local Starbucks and ask for “grounds for your garden” and they will give you a whole trash bag full of used espresso grounds).

So that’s my story! Now it’s ready for planting!
(Don’t forget to pin this post to save it for later!)


Some questions I’ve been asked about this project:
Some people have been asking me WHY I needed to kill grass to plant a garden. Why not just put dirt on top?
Well, I could have put dirt on top. But in my particular circumstance this seemed silly. First, my city was providing me with free, awesome dirt. Second, buying that much high quality dirt is expensive! Also, because I was not building a raised bed on top of my lawn – where laying cardboard in the bottom and then filling with dirt would have worked awesome – I needed to do something different. I already had a raised bed filled with good dirt – it just had a lawn growing on top of it!
I also heard this a lot: “Just spray a mix of vinegar, soap and salt on the grass to kill it. “
If you have a question about this process (or why I didn’t do something else instead!), let me know in the comments!

About the Author:
Her goal is to empower families to make easy projects and healthier choices that are beautiful and delicious! She is also the author of the hardcover cookbook, Beautiful Smoothie Bowls (Skyhorse, 2017) and Proven Techniques for Keeping Healthy Chickens (Skyhorse, 2018).
Her projects have been featured in magazines like Kids Crafts 1-2-3, Capper’s Farmer and Urban Farm Magazine. Follow her on Pinterest, Instagram, Twitter or join the Creative Green Living Tribe.

Do you like this post? Subscribe to our weekly newsletter!
When you subscribe you can download our FREE Recycled Crafts E-book!